D2BA December Challenge | CAS Christmas Ornament Card

Hello everyone… It is the first Sunday of the month and that means it’s time for a new challenge at Dare 2B Artzy Blog! This month’s theme is Clean and Simple. Just the perfect theme for this Holiday rush in making handmade cards. I always need more cards at the last minute for sure… LOL!!!

On my CAS Christmas ornament cards today I used:

Merry & Bright Collection Variety Paper Pack
Deck The Hall Stamp Set
Deck The Hall Dies
Joy To The World Dies
Curve Slimline Border Dies

These CAS Christmas ornament cards are very easy and quick to make. I cut out the ornaments from the pattern papers with the matching dies. And then I cut out also some of the snowflakes with the matching dies. For the other snowflakes on the card below, I stamped them first and then cut wit the matching die.

And for the top border, I used snowflake pattern paper and cut it with one of the curve slimline border dies.

I added all the pieces to the card with permanent adhesive glue. And then I stamped the sentiment on the card with an ink pad using the Mini Misti stamping tool. I used the mini snowflakes to embellish the card.

That’s it. Pretty simple and quick to make. I hope this sparks an idea for you to make projects to spread the joy and cheers of the Holidays season.

Now it’s your turn… Make CAS card projects and shared them with us at Artzy December Challenge for a chance to win a prize.

Thanks so much for stopping by my blog today. Have a fabulous day!

Here Comes The Santa Paws

Thanksgiving is over and Christmas is officially on the way now…

Here’s a Christmas Card idea for dog lovers 🐶🐾
I made this card using Graciellie Design digital files:

Puppy Christmas Digital Stamps
Merry Wood Sign Digital Stamps
Snowy Paws Background Digital Stamp

I printed the image ms on white cardstock with inkjet printer. And then I colored the image with Altenew Artist Markers and some glitter embossing on the hat for extra bling. After that, I cut the image with scissors.

For snowy effect, I added some white acrylic paint splatters on the card. I cut the background mat with stitches rectangle die. And then, I added the background mat to the card with permanent adhesive runner.

I embellished the wood sign with some stocking decorative glitter. I added the image to the card with 3D foam tape.

✨These digital files are 65% OFF until Monday!!!

Mixed Media Card | Never Cold When You’re Here

Winter is here…. For me it is time to bundle up and stay inside! It is only because I was not made for cold weather… HAHAHAHA… But, my friends, it is never cold when you are around me!!!

Today, I made this mixed media card with this penguin using:

– Winter Hugs Clear Stamp Set
– Winter Hugs Die Set
– Diamond Tile Stencil

I created the background using Distress watercolor pencils (set 1,2,3) and white acrylic paint. And then I put the stencil on it and using some White Coconut Gelatos to add the texture on it. I added the background panel on the card with permanent adhesive runner.

I stamped the image with VersaFine Clair Nocturne ink pad and I dried the ink with a craft heat gun. I colored the image using Altenew Artist alcohol markers and after coloring them, I cut them with the matching dies. I added them to the card with permanent adhesive glue.

For the sentiment. I stamped it on a white cardstock with black ink and then I cut it with the label die. I added to the card with thin 3D foam tape. And I embellished the card with some of those snowflake sequins.

Stay warm… Thanks for stopping by my blog today!

2022 Fall-Winter Coffee Lovers Blog Hop | Comfort and Joy Red Cup Mixed Media Card

Hello everyone… I hope you all have been having fun blog hopping and playing along with the 2022 Fall/Winter Coffee Lovers Blog Hop!

Today, I am sharing this Comfort and Joy Red Cup Mixed Media Card at Coffee Loving Cardmakers Blog. As you all can see…the spirit of Holidays is in me now… LOL… Also, happens today is Starbucks Red Cup Day.

I made this red cup mixed media card using Super Sponsors:

I used some goodies from Super Sponsor STAMPlorations Paper Goods Grab Bag. The fun of this grab bag is that you never know what you’ll get but I can guarantee that this Paper Goods Grab Bag will surprise you will fun things to use on your projects.

I used Super Sponsor Catherine Pooler Designs Ink Pads on the background mat to create the watercolor background. I cut the watercolored paper with STAMPlorations – Crazy Double Running Stitch Rectangle Nesting Dies. After that, I taped the Holly leaves ARTplorations stencil on the watercolored mat with the Therm-o-Web Purple Tape, added some embossing paste, and then I sprinkled with some glitter embossing powder and heated it up with craft heater.

I needed some patterns for the background. I stamped this Catherine Pooler Designs – Candy Cane Background Stamp directly on my front card with the Rockin’ Red Catherine Pooler Ink Pad with Mini MISTI. And look at that background!! LOVE IT!

I added the holly embossed background mat, coffee cup, and the sentiment on the card with E-Z Runner Grand from the Super Sponsor Scrapbook Adhesives by 3L. I embellished the card with clear gems.

That’s my card today… I hope it brings you joy… Thanks for stopping by today!

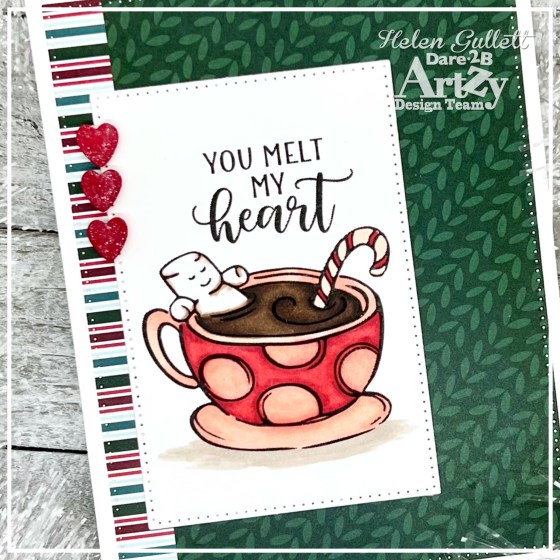
CAS Card | You Melt My Heart

Hello artzy friends!!! It surely feel like Winter is here early! This week has been freezing… and I am so thankful for hot beverages that can warm me from the inside. This CAS card today is inspired by one of the hot beverages: hot cocoa!

I am in love this cocoa guy! I made this hot cocoa CAS card using:

I stamped the cocoa image and sentiment on a white cardstock Totally Black Artzy Ink Pad using Mini MISTI stamping tool. And then I colored it with Artist Alcohol Markers. I cut it with one of the Rectangle Framelits Dies.

I picked the knit pattern paper from the Holiday Magic Variety Paper Pack and cut it with the largest size of the Rectangle Framelits Dies.

I added background paper and the cocoa panel to the card base with permanent adhesive runner. 

I cut some hearts out of red cardtock with the heart die that comes in the Crazy 4 Cocoa Die Set. I stacked 2 hearts together with dries-clear adhesive glue. I added some glitter to the hearts with Red Glitter Brush. And then I added them to the card with 3D foam tape as embellishments.

That’s my Cocoa card for today. I link up this card at the November Artzy Challenge! And… Have you checked the 2022 Fall/Winter Coffee Lovers Blog Hop? You still have time to hop along to see TONS of coffee/cocoa/tea projects! And you can also participate at the link up party for chance to win the prizes and Dare 2B Artzy is one of the Super Sponsors for this hop! Check out the projects from D2BA team here.

Thanks so much for stopping by my blog today. I hope you all have a fabulous day!