Fall CAS Card | Blessings To You

Hello artzy friends! I am so thankful to live in this part of the world where there is Fall season! Fall is here for sure with cooler days and leaves turn their colors beautifully. Inspired by Fall season, today I have this Fall theme CAS card to share with you all.

It is super easy to make using Dare 2B Artzy Fall Harvest Collection stamp sets, die sets, and papers.

I started with making the card front panel by cutting a piece of kraft cardstock using Rectangle Framelit Dies, and to cut the window circle I used the Double Dot Circle Framelit Die

I cut some leaves from the Autumn Leaves paper using the matching Fall Leaves Die. After that, I arranged them around the circle window and used double-sided tape to secure them in place.

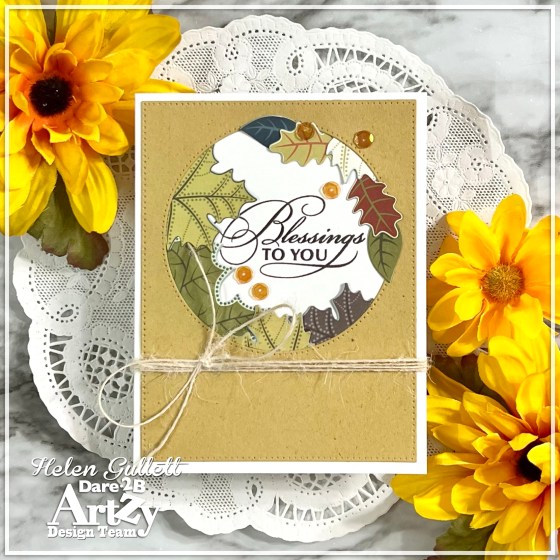
On my MISTI stamping tool, I lined up the front panel on top of the card base and then I add the sentiment stamp on it. I picked up the stamp with the lid, then removed the front panel. I secured the card with the magnets, and then I stamped one of the sentiments from the Give Thanks Stamp Set directly on the front card base with a Pinecone VersaFine Clair ink pad. 

I added the front panel on top of the card base with double-sided tape. I punched a tiny hole in the side of the card and then I wrapped around some of the natural twine ribbons. I added a dot of dries-clear adhesive glue underneath the bow to secure it in place. Then, I added some Fall color sequins on the card also with dries-clear sequins.

The Dare 2B Artzy October Challenge theme for this month is FAVORITE COLOR. You have a whole month to play along with the challenge. So, be sure to join in the fun for your chance at winning. The Challenge winner will get a $15 Gift Certificate!!! Head over to D2BA blog post to read the challenge rules and to link up your project.

I hope you all like this Fall CAS card today. Thanks so much for stopping here. Have a blessed season!

Mixed Media Card | Coffee Can Fix Anything

Hello hello hello coffee loving friends… It’s Thursday and let’s take a little coffee break with me today. My mixed media card today is a quite simple to make with no-stamping technique.

On my coffee card today, I used 3 die sets from STAMPlorations – Coffee Lover Bundle:

  • Zen Coffee 1 cover plate die
  • Tag O’ Coffee Dies
  • Coffee Fix phrase die

I cut out the kraft cardstock with the cover die and added it directly to the card base with permanent adhesive glue.

I had some gelprinted cardstocks in my stash and I grabbed the orange/yellow one and cut it with the tag die from the Tag O’ Coffee die set. After that, I added some more shadowing color on it with Stabilo Woodys watercolor pencils (red and white), and I blended the colors with finger.

For the sentiment, I found in my stash a piece of watercolor paper that already have some spray paints splatters on it. I cut it with the phrase die and I added on the tag with permanent adhesive glue.

I added the wrinkled ribbon bow on the tag and I added the finished tag to the card with permanent adhesive glue.

I hope you will like this card today. Thanks so much for stopping by our blog. Have a fabulous caffeinated day!!!

A Thank You Card For Dear Friend

Hello everyone… Today I would love to share an idea for a thank you card for a dear friend. This card is quick and easy to make with this simple design, especially when you want to make it in a batch of assortment sentiments for your stash.

This month’s theme for the October Artzy Challenge is Favorite Color. I was inspired by these Fall colors on the pattern paper. It is one of my favorite color combos for the season!

On my today’s card I used:

I cut out a dark brown cardstock in 4.25″ x 5.5″ and added it on top of the card base with the permanent adhesive runner. Next, I cut out the floral pattern paper from one of the Everything is Blooming Variety Paper Pack using the largest die size from the Rectangle Framelits Die Set and added it to the card with permanent adhesive.

I cut a strip of paper with the yellow pattern (the back of the floral pattern) and I added it to the card with the permanent adhesive runner. The double-sided pattern paper is what I like from Dare 2B Artzy paper collection. They match the color and are easy to pair up together.

I stamped one of the flower images from the Breezy Blossoms Stamp Set with Brilliance Dew Drop
Galaxy Gold Ink on white cardstock and dried it with a craft heat gun. I left it as it is because of the shimmery gold look, but you always can color it if you want to. Next, I cut it with the matching die from the Breezy Blossoms Die Set. I added the flower die cut on the card with 3D foam tape.

And then I arranged two of the sentiments from the Breezy Blossoms Stamp Set on the Mini MISTI stamping tool and stamped them on white cardstock using Totaly Black Artzy Ink Pad and then cut it with one of the Mini Borders Die Set. I added the sentiment on the card with 3D foam tape.

That’s the card for today. I hope you like it. Thanks so much for stopping by my blog. Have a fabulous day!!!

Dare 2B Artzy October Challenge | Favorite Color

Hello and Happy Sunday! It is the first Sunday of the month and we have a new challenge for you!

The Dare 2B Artzy October Challenge theme for this month is FAVORITE COLOR. You have a whole month to play along with the challenge. So, be sure to join in the fun for your chance at winning. The Challenge winner will get a $15 Gift Certificate!!! Head over to D2BA blog post to read the challenge rules and to link up your project.

And you can see, my favorite color is purple! I got with no-stamping technique to make this card. I only used stencils and die sets.

On my card, I used:
Gift Box Layering Stencils
Happy Birthday Layered Die with Balloon
Double Dot Circle Framelit Die

I stenciled the front card base. I taped the first layer of the stencils on the card and added the Memento Lulu Lavender ink on the card with oval brush blending tool. And then after removing the first stencil, I taped down the second layer of the stencils and added the Memento Grape Jelly ink on the card with the oval brush blending tool.

I for the circle and sentiment words, I used 2 shade of purple cardstocks I had in my stash. Luckly, they matched the inks!!!

Then, I added some of the white iridescent sequins on the card with dries-clear adhesive glue to embellish the this birthday card.

Now it’s your turn! We’d LOVE to see what you create. Thanks so much for stopping by my blog today. Have a wonderful day!

National Coffee Day | Sending A Sweet Hello

HAPPY NATIONAL COFFEE DAY to all of you, coffee lovers and crafting friends!!!

Have you hopped along with the Coffee Loving Cardmakers National Coffee Day Hop? Check it out on their blog post for inspiration and full list of blog hop participants. Make sure to visit each participant blog post and leave a comment for chances to win their prizes!!!

I made my coffee card using the stamps, die sets, and papers from Super Sponsor Dare 2B Artzy:
Be Frappe & Latte Love Stamp & Die Bundle
Rectangle Framelits Die
Slim Mini Wavy Layers Die

I hope this card perk you up and cheer you up. Thanks for stopping by my blog today. Have a fabulous caffeinated day!!!