Graciellie Design and WOW! Embossing Powders Collaboration Instagram Hop

Today, I am joining an amazing Instagram Hop celebaring the two amazing craft businesses WOW Embossing Powder and Graciellie Design.

Through out this Instagram Hop participants, which are the members of both design teams, not only will you be inspired along the way you’ll be entered to win a $75 Prize pack!!!

For chance to win… You simply follow the steps on both company Instagram posts: @gracielliedesign and @wowembossing.

Hop along and leave comments at each stop, as the giveaway winners will be chosen randomly from all the comments! You have until March 13th 2020 to leave a comment, winners will be announced on March 16th 2020 over on the @gracielliedesign and @wowembossing Instagram pages.

This is open internationally. Unfollowers/giveaway accounts do not qualify. Per Instagram rules, we must mention this is in no way sponsored, administered, or associated with Instagram or Facebook. By entering, entrants confirm they are 13+ years of age, release Instagram or Facebook of responsibility, and agree to their terms of use.

Here’s my first card for this Insta-Hop with Graciellie Design and WOW! Embossing Powder.

On my card I used:

  • WOW! Trio Bundled Up Catherine Pooler
  • Graciellie Design Hey Beautiful Mega Digital Stamp Set
  • Graciellie Design Coffee Lovers SVG Cut Files
  • Graciellie Design Rainbow Vibes Digital Papers ⠀

I printed the image on a watercolor paper using inkjet printer. I colored it with Tombow Dual Brush Pens and Water brush. Added some white splatters with white acrylic paint spray. I dried the image with craft heater and fussy cut it with scissors.

I cut out the leaves and word using the svg files and with my Silhouette Cameo. And then, I applied the surfaces with VersaMark ink pad and then I added the glitter embossing powder. I heat them up with craft heater. I did the embossing twice for thicker result.

For the background, I printed one of the patterned digital papers on 4×5 glossy photo paper and added on the white card with permanent adhesive runner. After that, I added the watercolored flower, embossed leaves, and embossed sentiment word on the card with dries-clear adhesive glue.

And on my second card I used:

  • WOW! Sparkles Gold Rush
  • WOW! Sparkles Flamingo
  • WOW! Sparkles Crown Jewel
  • Graciellie Design Family Love Digital Stamp Bundle

I printed the image on a watercolor paper using inkjet printer. I colored it with Tombow Dual Brush Pens and Water brush. I Added some white splatters with white acrylic paint spray. Then I dried it with craft heater and fussy cut it with scissors.

To create the shaker windows, I use the STAMPlorations Basic A2 Panels Nesting Dies – CUTplorations. I added the shaker frame on a white card with 3D foam tape. For the filler, I added each of the Sparkles Glitter at the each window.

I added the sentiment on top of the shaker window with permanent adhesive glue and the flower on the card with the 3D foam tape.

And before you go to the insta-hop, Gracie has all products on the store is 35% OFF from today until March 13th.

Thank you for stopping by today! Hope you all find amazing inspirations from both design teams.


I link up this project at:

Stencil Challenge | Smile, It’s Your Day

Hello everyone! It is a new month and it means a new stencil challenge. Today, I want to share this mixed media card.

Inspired by Spring, I made this mixed media card for this STAMPlorations March Stencil Challenge using Make Marks 3 ARTplorations StencilMake Marks 6 ARTplorations StencilBasic A2 Panels Nesting DiesCrazy Double Running Stitch Rectangle Nesting DiesSmile Stamp Set.

On the bottom layer background, I used my gelli printing plate, stencil and acrylic paint to pull out that black and white print.

The second background layer, I simply added the dye ink on the stencil using blending brush.

I stamped the lily flower image on a watercolor paper with VersaFine ink pad and then I colored the image with Sakura Koi Travel Watercolor paints and waterbrush. After that, I dried it with craft heater and then I fussy cut t with scissors.

I added the flower and sentiment on the card with 3D foam tape. Then I stamped the second phrase sentiment underneath it.

I hope you all find some inspirations around you and join us for this challenge. Thank you so much for stopping by my blog today. Have wonderful day!

Clear Scraps | Hearts Wood Mini Album

Valentine’s Day is about couple of days away… Can you feel the love in the air now? Today, I have a Love themed project to share with you all.

I used the Hearts Wood Card from one of the Clear Scraps Wood Card/Mini Album collections. This Wood card comes in 2 pieces: front piece has cut out shape and the back piece is solid rectangle.

The scrapbook papers and stickers I used on this Hearts Woo Mini Album are from ADORNit.

You can read all about this Hearts Wood Mini Album project and the tutorial at Clear Scraps Blog today. I hope you like this Wood Mini Album idea today. This can be a good gift for Valentine’s Day, Anniversary Day, Birthday, or even for Wedding.

Thank you so much for stopping by today. Have a wonderful day!

Love Is In The Air | XOXO Faux Wood Heart Card

Hello hello hello… Today, I am here with Love themed project. It is not too early for that, right?

On my card today, I use the newly released mega digital stamp set, Love Is In The Air, from Graciellie Design.

I used my Silhouette Studio program to open and edit the digital stamps and created cutting line. I printed the heart with InkJet printer and then cut it with my Silhouette Cameo 3.

I colored the wood heart shape with colored pencils and embellished it with some flowers and branch that I cut out using the Divinity Designs dies.

I also use the Sweet Love Digi Papers, Heart Cards SVG Cut Files, and Coffee Lovers SVG Cut Files. I also use Silhouette Studio to edit the svg files and cut them with Silhouette Cameo 3.

I added some white splatters on the card with white acrylic paint, water and flat brush. And added some sequins on the card for a little bit extra bling.

I hope love will fill your heart today. Thank you so much for stopping by today!


I link up this card at:

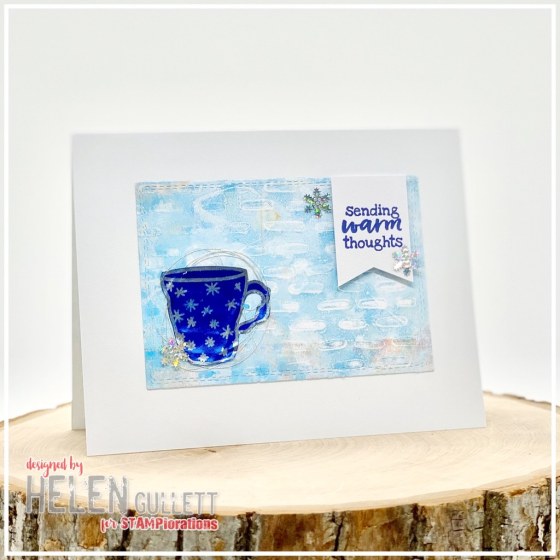
Stencil Challenge | Sending Warm Thoughts

HAPPY HAPPY HAPPY NEW YEAR TO YOU ALL!!! May this year brings you love, hope, peace and good health. May The LORD bless you and keep you in His mighty hands all through the year of 2020.

I have a warm thoughts card to share with you all on the first day of New Year as my first project.

I am inspired the Winter season and colors for this CAS card and using the Make Marks 1 ARTplorations StencilSnowy Cozy Stamp Set, and Crazy Double Running Stitch Rectangle Nesting Dies.

For the background, I used the gelli printing technique with stencil, acrylic paints and white cardstock. After the paints dried, I cut it with one of the stitch rectangle nesting dies.

I stamped the mug from the stamp set on a piece of Rinea foil paper with their Ghost Ink. After about 1 minute, I wiped off the ink with Hand Wipes. And then I fussy cut it with scissors.

For the sentiment, I stamped it on a white cardstock with VersaFine Clair ink and then trimmed it into label.

I embellished the card with some snowflake sequins and silver thread.

You all are invited to come and join us for STAMPlorations first Stencil Challenge of the year.

Thank you for stopping by. HAPPY NEW YEAR!


I also link up at: